本系列是学习《Fuzzing101 with LibAFL》系列博客(后文统称:原博客)的笔记分享,在学习介绍 LibAFL 用法的同时总结 Rust 知识点。
前置知识: fuzz基本概念、AFL基本使用
本篇要点:
- LibAFL
- Inprocess模式
- Harness
- 编译器wrapper
- LLPM,多核并行
- 漏洞分类:AFLTriage
- Rust
- 函数、闭包
- match 模式识别
- Option、Result
Execise-1.5
Execise-1 中编写的fuzzer十分甚至九分的简陋,距离实际应用还相差甚远。原博客在1.5集中列举了三种优化方法:
- 使用
afl-clang-lto 代替 afl-clang-fast—— fast 1.1x
- afl-clang-lto(link time optimization): 实现无碰撞插桩
- 使用 共享内存 干掉 文件I/O —— fast 3x
- patch源代码,加入
__AFL_FUZZ_INIT();宏
- 使用
InProcessExecutor 换掉 ForkserverExecutor—— fast 10x
- patch源代码,编写harness function和compiler wraper
由于 Execise-1 的目标xpdf是命令行程序,不是库,故需要做一定修改使其支持静态链接。其操作较为繁琐,涉及make迁移到cmake等,建议有需求时自行研究。
而 Execise-2 的目标libexif本身是一个库,不如借助 Execise-2 学习harness。
所以什么是harness?
Harness
v. 控制并利用;(把动物)拴在一起(或拴到某物上);给(马)套上挽具;连接,串联
n. (马的)挽具,马具;系带,吊带;日常工作
在面对一个库时,并没有现成的入口点,因此需要写一个函数来调用它,这个函数就是 harness。此时,harness成为了与fuzzer直接交互的目标。
也就是说,fuzzer是横冲直撞的野马,target是一望无际的草原,harness则是指引方向的缰绳。
使用harness时,fuzzer的所有工作将在一个进程中完成,即InProcess。这对性能有以下好处:
- 可以直接通过harness的编写促使fuzzer探索我们感兴趣的部分
- 与fork-server不同,进程内执行免去了进程管理的负担,这一点显著提升了性能
- 单进程模式天然支持多核,(一个fuzzer实例一个cpu核心)对现代多核处理器友好
那么代价是什么?由于harness将在一个进程中被反复执行,harness应满足以下要求:
- 不能有内存泄漏,否则将会对fuzzer本身造成破坏。
- 不要执行exit()。这会结束当前进程,应该发送abort以供fuzzer重启
- 避免高算法复杂度,避免大量内存占用,避免日志输出等拖慢速度的行为
是不是摩拳擦掌了呢?让我们重新加入战斗吧!
Execise-2 libexif
source & corpus
 1
 2
 3
 4
 5
 6
 7
 8
 9
10
11
12
13
14
15
16
|
# libexif的依赖
apt-get install autopoint libtool gettext libpopt-dev
# 下载源码
wget https://github.com/libexif/libexif/archive/refs/tags/libexif-0_6_14-release.tar.gz
tar -xf libexif-0_6_14-release.tar.gz
mv libexif-libexif-0_6_14-release libexif
# 准备corpus
mkdir corpus solutions
cd corpus
git clone --no-checkout --filter=blob:none https://github.com/libexif/libexif.git
cd libexif
## 只留图片
git checkout master -- test/testdata
mv test/testdata/*.jpg ../
cd ..
rm -rvf libexif
|
Cargo.toml
在InProcess模式中,需要编译器把fuzzer,target,harness全部链接到一起。故以库的形式创建项目:
cargo new --lib exercise-2
同时,本篇也用到了Libafl的全部组件:
 1
 2
 3
 4
 5
 6
 7
 8
 9
10
11
12
13
14
15
16
17
18
19
|
# execise-2/Cargo.toml
[package]
name = "exercise-2"
version = "0.1.0"
edition = "2021"

[dependencies]
libafl = { version = "0.10.1" } # libafl core
libafl_cc = { version = "0.10.1" } # compiler wrapper
libafl_targets = { version = "0.10.1", features = [
    "libfuzzer",
    "sancov_pcguard_hitcounts",
    "sancov_cmplog",
] } # common code for targets instrumentation

[lib]
name = "exercisetwo"
crate-type = ["staticlib"]
# 生成 libexercisetwo.a
|
cargo-make
使用build.rs能够增加自动化程度,但用rust写shell依旧略显繁琐。于是原博客引入了 cargo-make 工具,在cargo原本的Cargo.toml基础上加入了Makefile.toml,用以自定义配置,构建自动化工作流。
类似于Makefile,又有点像docker-compose.yml。
- 安装:
cargo install --force cargo-make
如下所示,既可以执行cargo make build一句话跑通全部,也可单独执行cargo make build-libexif,十分灵活。
 1
 2
 3
 4
 5
 6
 7
 8
 9
10
11
12
13
14
15
16
17
18
19
20
21
22
23
24
25
26
27
28
29
30
|
# execise-2/Makefile.toml
[tasks.build]
dependencies = ["clean", "build-compilers", "copy-project-to-build", "build-libexif", "build-fuzzer"]

[tasks.build-compilers]
command = "cargo"
args = ["build", "--release"]

[tasks.copy-project-to-build]
script = """
mkdir -p build/
cp ${CARGO_MAKE_WORKING_DIRECTORY}/../target/release/ex2_compiler build/
cp ${CARGO_MAKE_WORKING_DIRECTORY}/../target/release/libexercisetwo.a build/
"""

[tasks.build-fuzzer]
cwd = "build"
command = "./ex2_compiler"
args = ["-I", "../libexif/libexif", "-I", "../libexif", "-o", "fuzzer", "../harness.c", "lib/libexif.a"]
# -Idir 增加dir为头文件的搜索路径

[tasks.build-libexif]
cwd = "libexif"
env = { "CC" = "/fuzzing101/exercise-2/build/ex2_compiler", "LLVM_CONFIG" = "llvm-config-15"}
script = """
autoreconf -fi
./configure --enable-shared=no --prefix="${CARGO_MAKE_WORKING_DIRECTORY}/../build/"
make -i
make install -i
"""
|
看起来清爽多了(此时👴还没有意识到问题的严重性)。
补充:Linux开发工具链
./configure 配置: 根据Makefile.in模板和系统信息生成Makefile
make 编译:根据Makefile将源代码编译成可执行文件
make install 安装:将可执行文件复制到正确的地方
autoreconf:属于 autotools 工具链,也是生成makefile的自动化工具。后逐渐被cmake取代。(现在流行的是Ant?)
harness & compiler
harness.c
harness的核心,也就是被fuzzer调用的位置,是LLVMFuzzerTestOneInput()函数。
其输入是一个字节数组和其尺寸。主流fuzzer都接受这个函数声明,或许是因为他们后端都用的LLVM的Libfuzzer吧。
在Libexif的test目录下有test-fuzzer-persistent.c,是一个适用于AFL持久模式的harness。稍加改造即可:
- 删除 AFL 宏
- 删除任何打印/日志语句
- 将
main() 重命名为 LLVMFuzzerTestOneInput()
- 修复其他版本问题
compiler.rs
显然,这部分并没有让我们写一个编译器,而是一个套壳,一层包装(wrapper)。
这里将target与fuzzer静态链接在一起,并加入-fsanitize=address参数以使用ASAN。
 1
 2
 3
 4
 5
 6
 7
 8
 9
10
11
12
13
14
15
16
17
18
19
20
21
|
// exercise-2/src/bin/ex2_compiler.rs
pub fn main() {
    let cwd = env::current_dir().unwrap();
    let args: Vec<String> = env::args().collect();

    let mut cc = ClangWrapper::new();

    if let Some(code) = cc
        .cpp(false)
        .silence(true)
        .parse_args(&args)
        .expect("Failed to parse the command line")
        .link_staticlib(&cwd, "exercisetwo")
        .add_arg("-fsanitize-coverage=trace-pc-guard")
        .add_arg("-fsanitize=address")
        .run()
        .expect("Failed to run the wrapped compiler")
    {
        std::process::exit(code);
    }
}
|
开始编写fuzzer之前,根据项目的文件结构梳理一下编译逻辑:
build-compilers: 生成自己的编译器:编译时链接fuzzer库。build-libexif:用自己的编译器编译targetbuild-fuzzer:用自己的编译器编译harness,并链接target库
 1
 2
 3
 4
 5
 6
 7
 8
 9
10
|
|-- Cargo.toml
|-- Makefile.toml
|-- corpus
|-- harness.c
|-- libexif
|-- solutions
`-- src
    |-- bin
    |   `-- ex2_compiler.rs
    `-- lib.rs
|
Libafl: Inprocess模式
组件:Observer & Feedback
由于我们使用的不再是afl-clang-fast,而是使用自己的编译器wrapper。故__AFL_SHM_ID已经不好使了。好在libafl_targets提供了EDGES_MAP:std_edges_map_observer。
1
2
|
let edges_observer =
    HitcountsMapObserver::new(unsafe{std_edges_map_observer("edges")});
|
此外,简单的超时反馈也改为了真正的崩溃反馈:CrashFeedback。
1
2
|
let mut objective =
    feedback_and_fast!(CrashFeedback::new(), MaxMapFeedback::new(&edges_observer));
|
组件:Monitor & EventManager & Status
EventManager 在 Inprocess 模式中才真正发挥功用。对于多实例环境,通信问题必须解决。LibAFL设计了一套低级消息传递协议(LLMP),使用C-S架构,第一个执行的fuzzer作为代理(Broker),后续执行的均作为客户端(Client)。Client负责不断执行,将信息汇总与Broker综合展示。
此外, Inprocess 模式还必须设定进程的重启,setup_restarting_mgr_std第一次执行中返回(None, LlmpRestartingEventManager),后续则返回上一个进程留下的状态,以此实现状态的永续。
 1
 2
 3
 4
 5
 6
 7
 8
 9
10
11
12
13
14
15
16
17
18
19
20
21
|
    let monitor = MultiMonitor::new(|s| {
        println!("{}", s);
    }); // MultiMonitor: 同时支持Broker模式或Client模式

    let (state, mut mgr) = match setup_restarting_mgr_std(monitor, 1337, EventConfig::AlwaysUnique){
        Ok(res) => res,
        Err(err) => match err {
            Error::ShuttingDown => { return Ok(()); }
            _ => { panic!("Failed to setup the restarting manager: {}", err); }
        },
    };

    let mut state = state.unwrap_or_else(|| {
        StdState::new(
            StdRand::with_seed(current_nanos()),
            input_corpus,
            solutions_corpus,
            &mut feedback,
            &mut objective,
        ).unwrap()
    });
|
Rust 基础之函数返回值、模式匹配与错误处理
本例中的mgr是一个经典的match用法,用match处理函数的返回值。下面把概念和符号捋一遍:
函数
Rust 的函数体由一系列语句组成,最后由表达式结尾。必须严格分别表达式和语句。因为表达式代表一个返回值,而语句不返回。
1
2
3
4
|
fn FUNC(PARAM: TYPE, PARAM: TYPE, ...) -> RETURN_TYPE {
    STATEMANT;
    EXPRESSION
 }
|
;: 标识一条语句。表达式没有分号。!: 标识发散函数(diverge function),没有返回值。如println!("{}", s),panic!()
panic!(): 线程恐慌。单线程程序即报错退出。
(): 空元组,不占用内存。无返回值时的返回值。
模式匹配
match相当于switch的加强版:
1
2
3
4
5
|
match VALUE {
    PATTERN => EXPRESSION,
    PATTERN => EXPRESSION,
    ...
}
|
_: 表示剩余情况的PATTERN。- exhaustive特性:变量的所有可能性必须全部被覆盖。
错误处理
函数返回值常用两类泛型枚举进行包装:
1
2
3
4
5
6
7
8
|
pub enum Option<T> { // 可选值
    None, // 可以没有值。适用于许多情况:初始值,可选参数,错误(不会panic!)
    Some(T), // 必须有值
}
enum Result<T, E> { // 返回值
   Ok(T),
   Err(E), // Err可以不panic!
}
|
Rust对Result实现了许多方便的方法,详情请参阅文档。
unwrap():解包Result,才能获取值
?:语法糖,将Err对象传播出来,进一步使代码简洁。
1
2
3
4
5
|
let result = match FUNC() {
    Err(e) => return Err(e),
    Ok(f) => f,
};
let result = FUNC()?; //等价写法
|
参考文档:
组件:Harness & Executor
在fuzzer侧,LLVMFuzzerTestOneInput()对应libfuzzer_test_one_input()函数
 1
 2
 3
 4
 5
 6
 7
 8
 9
10
11
12
13
14
|
let mut harness = |input: &BytesInput| {
    let target = input.target_bytes();
    let buffer = target.as_slice();
    libfuzzer_test_one_input(buffer);
    ExitKind::Ok
};

let in_proc_executor = InProcessExecutor::new(
    &mut harness,
    tuple_list!(edges_observer, time_observer),
    &mut fuzzer,
    &mut state,
    &mut mgr,
).unwrap();
|
fuzzer写完了,善!
Rust 基础之闭包
闭包(closure),一般语言的闭包就是 lambda 表达式或匿名函数,在Rust中还要加上捕获外部环境中的变量的能力。
闭包捕获变量的方式分为三类:按顺序捕获
- Fn:表示捕获方式为通过不可变引用(&T)的闭包
- FnMut:表示捕获方式为通过可变引用(&mut T)的闭包
- FnOnce:表示捕获方式为通过值(T)的闭包
实际上,闭包就是这三种Trait的语法糖。关于Trait目前大致理解成某种规定泛型对象的行为的东西。如上面的三类函数,不同程度上约束了泛型。深度内容留待后文学习。
究竟何为“捕获”?Rust是没有垃圾回收的语言,取而代之的是生命周期。引用时,会自动分析变量生命周期,以决定使用哪个Trait。
还可以使用关键字move强制转移所有权到闭包中
参考文档:https://rustwiki.org/zh-CN/rust-by-example/fn/closures/capture.html
跑🏃
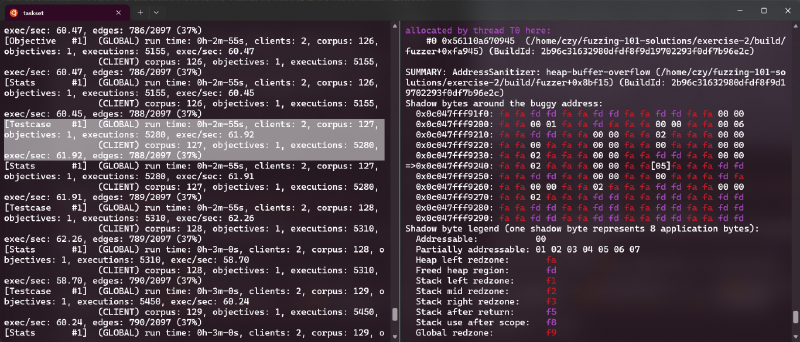
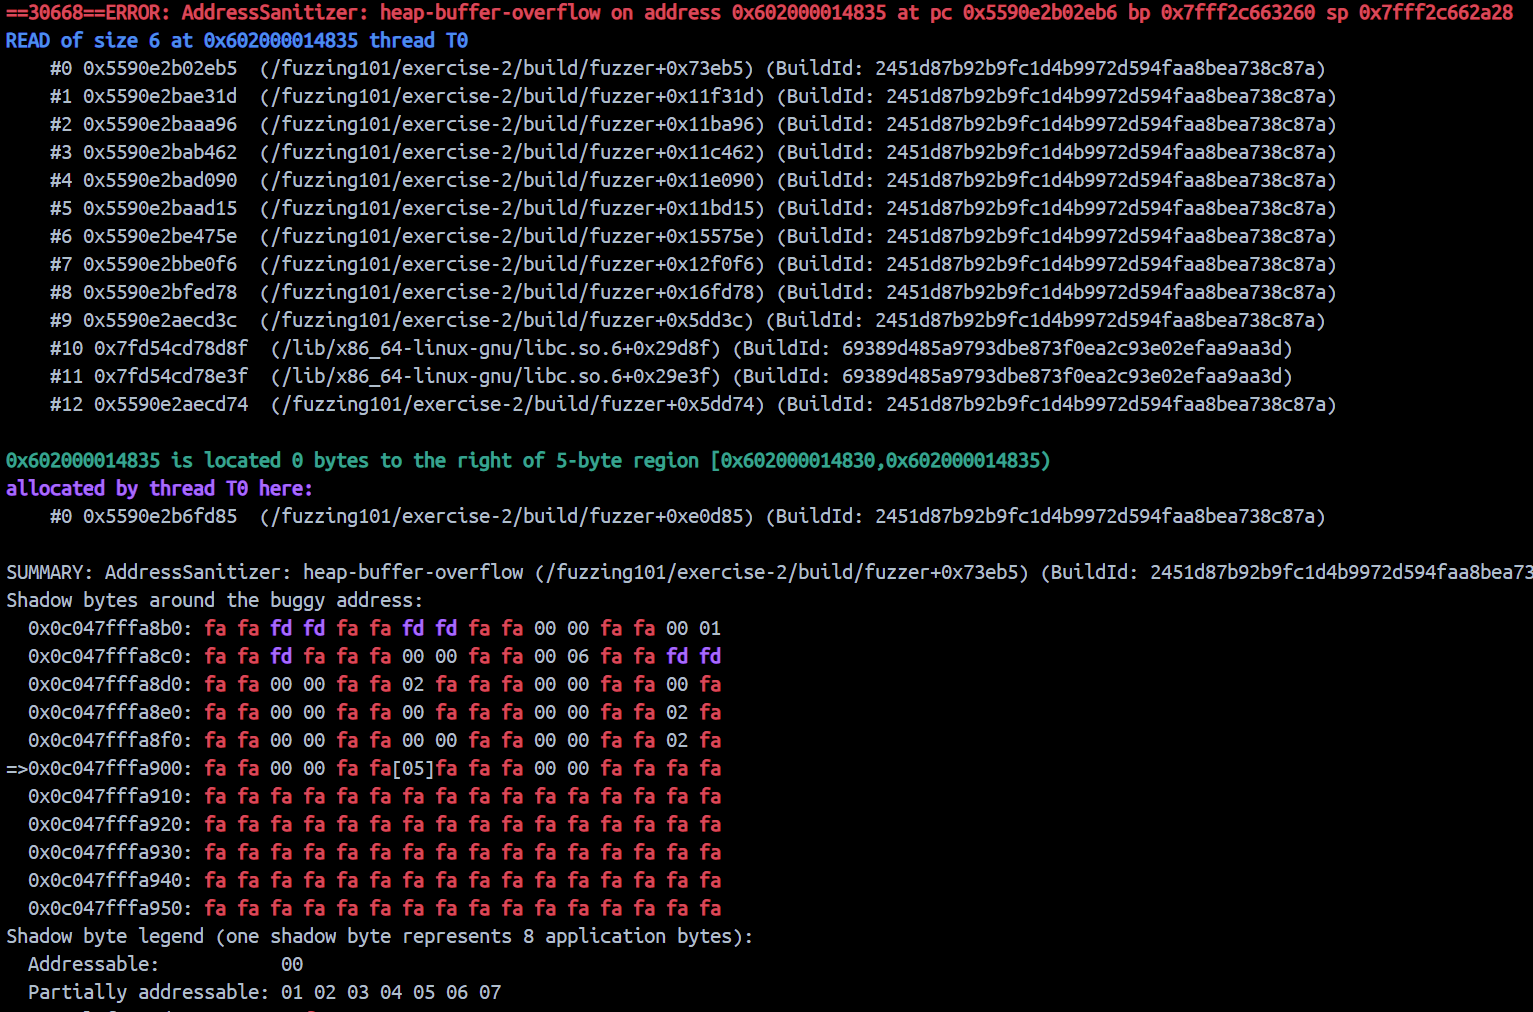
使用ASAN很快就发现了崩溃:
1
2
3
4
5
6
7
8
|
[AFL++ ae703a5ce157] /fuzzing101/exercise-2 # taskset -c 4 ./build/fuzzer
[Broker      #0]  (GLOBAL) run time: 0h-0m-57s, clients: 0, corpus: 0, objectives: 0, executions: 0, exec/sec: 0.000
                  (CLIENT) corpus: 0, objectives: 0, executions: 0, exec/sec: 0.000
-------------8<-------------
[Stats       #3]  (GLOBAL) run time: 0h-1m-0s, clients: 4, corpus: 3, objectives: 0, executions: 6, exec/sec: 0.000
                  (CLIENT) corpus: 3, objectives: 0, executions: 6, exec/sec: 0.000, edges: 9/10 (90%)
[Testcase    #3]  (GLOBAL) run time: 0h-1m-0s, clients: 4, corpus: 4, objectives: 0, executions: 8, exec/sec: 0.000
                  (CLIENT) corpus: 4, objectives: 0, executions: 8, exec/sec: 0.000, edges: 9/10 (90%)
|
Debug:我log去哪了
但结果并不让人满意,起因是cargo make build执行并未成功,上述结果是手动编译得到。报错如下:
 1
 2
 3
 4
 5
 6
 7
 8
 9
10
11
12
13
14
15
16
17
|
[cargo-make] INFO - Running Task: build-libexif
-------------8<-------------
checking for a BSD-compatible install... /usr/bin/install -c
checking whether build environment is sane... yes
checking for a race-free mkdir -p... /usr/bin/mkdir -p
checking for gawk... no
checking for mawk... mawk
checking whether make sets $(MAKE)... yes
checking whether make supports nested variables... yes
checking for POSIX sh $() command substitution... yes
checking for gcc... /fuzzing101/exercise-2/build/ex2_compiler
checking whether the C compiler works... no
configure: error: in `/fuzzing101/exercise-2/libexif':
configure: error: C compiler cannot create executables
See `config.log' for more details
[cargo-make] ERROR - Error while executing command, exit code: 77
[cargo-make] WARN - Build Failed.
|
它提示我,我的编译器不大好使。但是较为离谱的是手动执行编译却没问题。
那么我们看看config.log吧,然后就有个问题,config.log到底藏哪了。
👴:你根本不在工作目录,你躲哪去了
cargo make: 我不到啊

这个幽灵问题折磨了我许久,直到我意识到Makefile.toml里面的clean选项。。。
1
2
3
4
5
|
... rest of stderr output deleted ...
configure:3778: $? = 0
configure:3767: /fuzzing101/exercise-2/build/ex2_compiler -V >&5
clang: error: unsupported option '-V -g'
clang: error: no such file or directory: '/fuzzing101/exercise-2/libexif/libexercisetwo.a'
|
虽然还是不理解为什么,但是照猫画虎把libexercisetwo.a放入就编译成功了。
Debug:内存爆了!
尽管很快跑出crash,但fuzzer经常崩溃退出,导致并没有crash保存。报错如下:
1
2
3
4
|
thread '<unnamed>' panicked at 'Fuzzer-respawner: Storing state in crashed fuzzer instance did not work, no point to spawn the next client! This can happen if the child calls `exit()`, in that case make sure it uses `abort()`, if it got killed unrecoverable (OOM), or if there is a bug in the fuzzer itself. (Child exited with: 9)', /root/.cargo/registry/src/index.crates.io-6f17d22bba15001f/libafl-0.10.1/src/events/llmp.rs:1071:21
note: run with `RUST_BACKTRACE=1` environment variable to display a backtrace
fatal runtime error: failed to initiate panic, error 5
Aborted
|
报错告诉我们可能有以下原因:
- child calls
exit():我跑的确实是ASAN_OPTIONS=abort_on_error=1 taskset -c 6 ./build/fuzzer
- fuzzer有bug:我可以不相信我自己,但我不能不相信 Rust。
- OOM:内存溢出。观察下任务管理器,可以发现fuzzer执行后内存占用迅速飙升,在达到90%后fuzzer稳定崩溃退出。
那么基本确认是内存溢出的问题。👴的16G属实不堪大用,这下不得不买内存条了。
那么基本确认问题无解了吗?👴开始怀疑问题出在Docker上。于是👴回到宿主机 WSL2 上重新配环境。还是在执行cp build/libexercisetwo.a libexif之后成功编译。
这次能够稳定运行一段时间了,并且成功获得objective。👴就是个睿智。

👴宣布实验2完成。
成果落地
好吧还有最后一步。在诸多crash中可能有大量假阳性,大量重复漏洞,为了获得最终的CVE编号,还需要费时费力的辨别。AFLTriage 就是解决这个问题的自动化工具,它使用 GDB 并行的执行漏洞分类、 ASAN 解析和 crash 去重等工作。
AFLTriage 的工作流程十分简单:将crash依次丢进target执行,并解读执行报告。
因此,首先要为harness添加一个main函数,使其调用一次LLVMFuzzerTestOneInput()
 1
 2
 3
 4
 5
 6
 7
 8
 9
10
11
12
13
14
|
// harness.c
#ifdef TRIAGE_TESTER
int main(int argc, char* argv[]) {
    struct stat st;
    char *filename = argv[1];
    stat(filename, &st);
    FILE *fd = fopen(filename, "rb");
    char *buffer = (char *)malloc(sizeof(char) * (st.st_size));
    fread(buffer, sizeof(char), st.st_size, fd);
    LLVMFuzzerTestOneInput(buffer, st.st_size);
    free(buffer);
    fclose(fd);
}
#endif
|
这里通过#ifdef宏指令和build选项对应,执行cargo make build-triager即可进入分类流程。
1
2
3
4
|
[tasks.build-triager]
cwd = "build"
command = "./ex2_compiler"
args = ["-D", "TRIAGE_TESTER", "-I", "../libexif/libexif", "-I", "../libexif", "-o", "triager", "../harness.c", "lib/libexif.a"]
|
最后执行AFLTriage:../AFLTriage/target/release/afltriage -i ./solutions/ -o ./reports/ ./build/triager @@
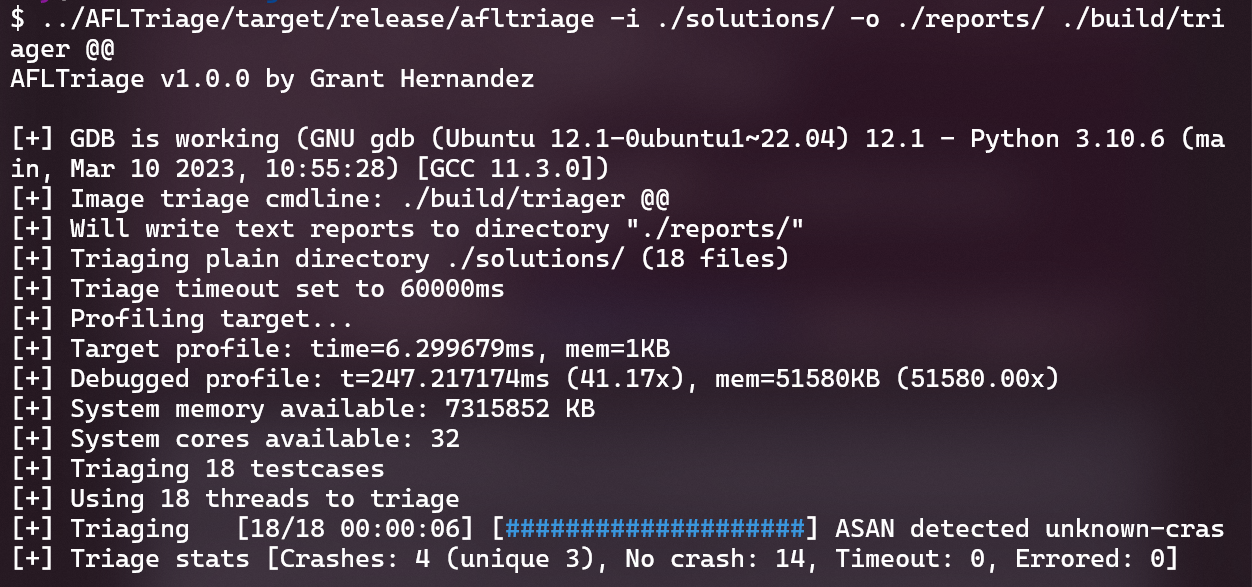
得到3个report:
1
2
3
|
afltriage_ASAN_heap-buffer-overflow_READ_exif_entry_get_value_f8a5a368646cf8484298dd0549da6e12.txt
afltriage_ASAN_unknown-crash_WRITE_exif_mnote_data_olympus_save_1e4a69a1a4d7585d8ae1e143a3b5eb94.txt
afltriage_SIGSEGV___memmove_sse2_unaligned_erms_b1cfe4f5c38c4991e7c55dccdfb06372.txt
|
👴还有点怀疑ASAN的输出好像都是fuzzer里面的bug,但是阅读报告之后发现确实是target里面的。只是原博客的ASAN能够指出Target源代码的行号,👴的只能拿到二进制地址。
 1
 2
 3
 4
 5
 6
 7
 8
 9
10
11
12
|
Summary: ASAN detected heap-buffer-overflow in exif_entry_get_value after a READ leading to SIGABRT (si_signo=6) / SI_TKILL (si_code=-6)
-------------8<-------------
#10 0x0000555555695c85 in exif_entry_get_value (/home/czy/fuzzing-101-solutions/exercise-2/build/triager)
    542: const exif_entry_get_value(e = (ExifEntry *)0x604000000350, val = (char *)<optimized out>, maxlen = (unsigned int)1999) {
    |||:
    |||: /* Local reference: ExifEntry * e = 0x604000000350; */
    682: 		 */
    683: 		if (e->size && e->data &&
    684: 		    (strspn ((char *)e->data, " ") != strlen ((char *) e->data)))
    |||:
    ---: }
    at exif-entry.c:684
|
只能说👴的环境还是有点毛病, WSL2 里面跑比 WSL2+Docker 里面跑,稳定运行时间长,但也不超过三分钟。👴只能手动断断续续的重新跑,这样fuzzer的状态其实是丢失了的。后面的实验还是别折腾我这个破本子了。
而且跑出来的crash👴看着也不像预期要挖的那俩CVE。但是这些都不影响👴再次宣布实验2完成。